
![]() Nieuwe foto opladen
voor Mullaghmore
|
voor een andere surf break
Nieuwe foto opladen
voor Mullaghmore
|
voor een andere surf break
| 3 hours earlier |
Peak Waves | Wind | Wind Waves | Swell 1 | Swell 2 | 3 hours later |
|---|---|---|---|---|---|---|
|
W |
S |
SSW |
W |
|||
| 9 s |
cross- off |
4 s | 9 s |
Open ocean wave model on 8 November at 3 pm
Forecast wind and swell just offshore from Mullaghmore around the time the photo was taken
| 3 hours earlier |
Peak Waves | Wind | Wind Waves | Swell 1 | Swell 2 | 3 hours later |
|---|---|---|---|---|---|---|
|
W |
SW |
SSW |
W |
|||
| 9 s | cross | 4 s | 9 s |
Open ocean wave model on 8 November at 6 pm
Forecast wind and swell just offshore from Mullaghmore around the time the photo was taken
| 3 hours earlier |
Peak Waves | Wind | Wind Waves | Swell 1 | Swell 2 | 3 hours later |
|---|---|---|---|---|---|---|
|
W |
WNW |
W |
S |
|||
| 10 s |
cross- on |
10 s | 4 s |
Open ocean wave model on 8 November at 9 pm
Forecast wind and swell just offshore from Mullaghmore around the time the photo was taken
| 3 hours earlier |
Peak Waves | Wind | Wind Waves | Swell 1 | Swell 2 | Swell 3 | 3 hours later |
|---|---|---|---|---|---|---|---|
|
W |
WSW |
W |
WNW |
NW |
|||
| 11 s |
cross- on |
11 s | 18 s | 9 s |
Open ocean wave model on 9 November at 12 am
Forecast wind and swell just offshore from Mullaghmore around the time the photo was taken
| 3 hours earlier |
Peak Waves | Wind | Wind Waves | Swell 1 | Swell 2 | 3 hours later |
|---|---|---|---|---|---|---|
|
WNW |
WSW |
WNW |
W |
|||
| 17 s |
cross- on |
17 s | 11 s |
Open ocean wave model on 9 November at 3 am
Forecast wind and swell just offshore from Mullaghmore around the time the photo was taken
| 3 hours earlier |
Peak Waves | Wind | Wind Waves | Swell 1 | Swell 2 | 3 hours later |
|---|---|---|---|---|---|---|
|
WNW |
WSW |
WNW |
||||
| 17 s |
cross- on |
17 s |
Open ocean wave model on 9 November at 6 am
Forecast wind and swell just offshore from Mullaghmore around the time the photo was taken
| 3 hours earlier |
Peak Waves | Wind | Wind Waves | Swell 1 | Swell 2 | 3 hours later |
|---|---|---|---|---|---|---|
|
WNW |
SW |
WNW |
||||
| 16 s | cross | 16 s |
Open ocean wave model on 9 November at 9 am
Forecast wind and swell just offshore from Mullaghmore around the time the photo was taken
| 3 hours earlier |
Peak Waves | Wind | Wind Waves | Swell 1 | Swell 2 | 3 hours later |
|---|---|---|---|---|---|---|
|
WNW |
SW |
WNW |
||||
| 15 s | cross | 15 s |
Open ocean wave model on 9 November at 12 pm
Forecast wind and swell just offshore from Mullaghmore around the time the photo was taken
| 3 hours earlier |
Peak Waves | Wind | Wind Waves | Swell 1 | Swell 2 | 3 hours later |
|---|---|---|---|---|---|---|
|
WNW |
SW |
W |
||||
| 15 s | cross | 15 s |
Open ocean wave model on 9 November at 3 pm
Forecast wind and swell just offshore from Mullaghmore around the time the photo was taken
| 3 hours earlier |
Peak Waves | Wind | Wind Waves | Swell 1 | Swell 2 | 3 hours later |
|---|---|---|---|---|---|---|
|
WNW |
SW |
W |
||||
| 14 s | cross | 14 s |
Open ocean wave model on 9 November at 6 pm
Forecast wind and swell just offshore from Mullaghmore around the time the photo was taken
| 3 hours earlier |
Peak Waves | Wind | Wind Waves | Swell 1 | Swell 2 | 3 hours later |
|---|---|---|---|---|---|---|
|
WNW |
W |
W |
||||
| 14 s |
cross- on |
14 s |
Open ocean wave model on 9 November at 9 pm
Forecast wind and swell just offshore from Mullaghmore around the time the photo was taken
| 3 hours earlier |
Peak Waves | Wind | Wind Waves | Swell 1 | Swell 2 | 3 hours later |
|---|---|---|---|---|---|---|
|
WNW |
WNW |
WNW |
||||
| 13 s |
cross- on |
13 s |
Open ocean wave model on 10 November at 12 am
Forecast wind and swell just offshore from Mullaghmore around the time the photo was taken
| 3 hours earlier |
Peak Waves | Wind | Wind Waves | Swell 1 | Swell 2 | 3 hours later |
|---|---|---|---|---|---|---|
|
WNW |
WNW |
WNW |
||||
| 13 s |
cross- on |
13 s |
Open ocean wave model on 10 November at 3 am
Forecast wind and swell just offshore from Mullaghmore around the time the photo was taken
| 3 hours earlier |
Peak Waves | Wind | Wind Waves | Swell 1 | Swell 2 | 3 hours later |
|---|---|---|---|---|---|---|
|
WNW |
WSW |
WNW |
||||
| 13 s | cross | 13 s |
Open ocean wave model on 10 November at 6 am
Forecast wind and swell just offshore from Mullaghmore around the time the photo was taken
| 3 hours earlier |
Peak Waves | Wind | Wind Waves | Swell 1 | Swell 2 | 3 hours later |
|---|---|---|---|---|---|---|
|
WNW |
SSW |
WNW |
||||
| 13 s |
cross- off |
13 s |
Open ocean wave model on 10 November at 9 am
Forecast wind and swell just offshore from Mullaghmore around the time the photo was taken
| 3 hours earlier |
Peak Waves | Wind | Wind Waves | Swell 1 | Swell 2 | 3 hours later |
|---|---|---|---|---|---|---|
|
WNW |
SSW |
WNW |
||||
| 13 s |
cross- off |
13 s |
Open ocean wave model on 10 November at 12 pm
Forecast wind and swell just offshore from Mullaghmore around the time the photo was taken
| 3 hours earlier |
Peak Waves | Wind | Wind Waves | Swell 1 | Swell 2 | 3 hours later |
|---|---|---|---|---|---|---|
|
WNW |
SW |
WNW |
||||
| 13 s | cross | 13 s |
Open ocean wave model on 10 November at 3 pm
Forecast wind and swell just offshore from Mullaghmore around the time the photo was taken
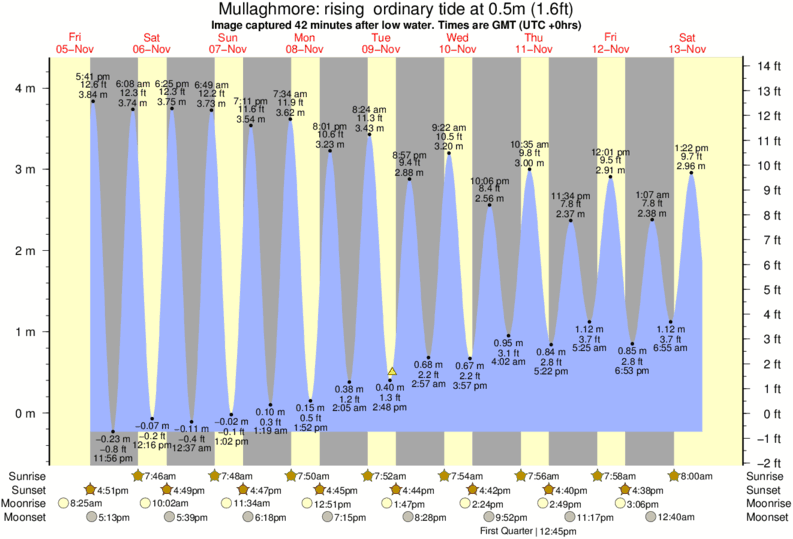
Image captured 42 minutes after low water (rising ordinary tide). Tide height was 0.5m (1.6 ft). Range 4.19m (13.7 ft). Toggle tide graph

Mullaghmore Surffoto: 'Do NOT get caught inside!!' door John Rattey
Some bombs rolled through.
 Nearest